Character Recognizer Demo
This is a demo application for character recognition using the Raspberry Pi Pico and an ILI9341 display, based on the EMNIST dataset. It utilizes the pico-jxglib library and TensorFlow Lite for Microcontrollers.
Depending on the selected model, this demo can recognize not only digits (0-9) but also uppercase letters (A-Z) and some lowercase letters (a, b, d, e, f, g, h, n, q, r, t).
GitHub repository: https://github.com/ypsitau/pico-Recognizer-ILI9341.git
Demo Video
Requirements
To build this project, you will need the following components:
- Raspberry Pi Pico, Pico W, Pico 2, or Pico 2 W
- ILI9341 display module
- Breadboard and jumper wires
- Micro USB cable
Wiring
Connect the Raspberry Pi Pico and ILI9341 display as follows:
| Raspberry Pi Pico | ILI9341 Display |
|---|---|
| GPIO2 (SPI0 SCK) | T_CLK |
| GPIO3 (SPI0 TX) | T_DIN |
| GPIO4 (SPI0 RX) | T_DO |
| GPIO8 | T_CS |
| GPIO9 | T_IRQ |
| GPIO10 | RESET |
| GPIO11 | DC |
| GPIO12 | CS |
| GPIO13 | LED |
| GPIO14 (SPI1 SCK) | SCK |
| GPIO15 (SPI1 TX) | SDI (MOSI) |
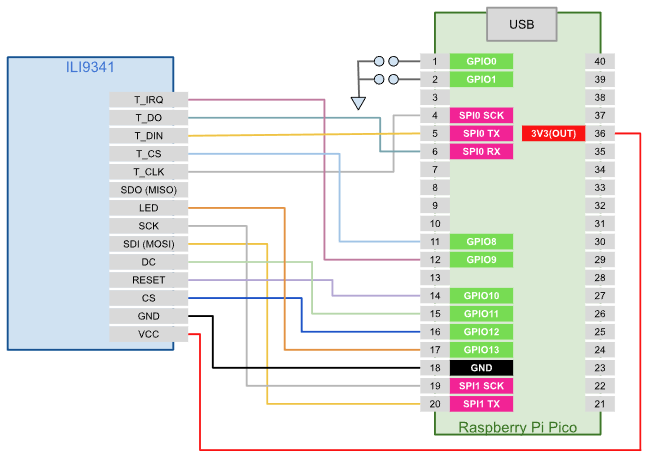
Model Selection (GPIO0 and GPIO1)
GPIO0 and GPIO1 are used to select the TFLite model for recognition. Each model is trained on a different subset of the EMNIST dataset. By connecting GPIO0 and GPIO1 to GND, you can select the model as follows:
| GPIO1 | GPIO0 | Training Dataset | Recognizable Characters |
|---|---|---|---|
| NC | NC | EMNIST Balanced | 0-9, A-Z, a, b, d, e, f, g, h, n, q, r, t |
| NC | GND | EMNIST MNIST | 0-9 |
| GND | NC | EMNIST Letters | A-Z |
| GND | GND | EMNIST ByMerge | 0-9, A-Z, a, b, d, e, f, g, h, n, q, r, t |
Installation
To write the pre-built binary to the Pico board, follow these steps:
- While holding down the BOOTSEL button on the Pico board, connect it to your PC via USB. Release the button after connecting.
- The Pico board will be recognized as a removable drive (such as
D:). Copy one of the following UF2 files to the drive:
| Pico Board | UF2 File |
|---|---|
| Pico / Pico W | pico-Recognizer-ILI9341.uf2 |
| Pico 2 / Pico 2 W | pico2-Recognizer-ILI9341.uf2 |
Build Instructions
To build from source code, follow these steps:
- Run the following commands in your terminal:
git clone https://github.com/ypsitau/pico-Recognizer-ILI9341.git
cd pico-Recognizer-ILI9341
git submodule update --init --recursive
- Open the project folder in Visual Studio Code with
code .and pressF7to build. Thepico-Recognizer-ILI9341.uf2file will be generated in thebuildfolder.
Training and Embedding TensorFlow Lite Models
Instructions for training the model on Google Colab and exporting it in TensorFlow Lite format are provided in this notebook. Running the scripts in the notebook will generate and download the following tflite files:
Recognizer-emnist-mnist-binary.tfliteRecognizer-emnist-letters-binary.tfliteRecognizer-emnist-balanced-binary.tfliteRecognizer-emnist-bymerge-binary.tflite
With the EmbedTfLiteModel macro defined in pico-jxglib, you can embed the generated model files into your Pico application without manually converting them to C arrays. Add the following lines to your source code:
EmbedTfLiteModel("Recognizer-emnist-mnist-binary.tflite", modelData_emnist_mnist, modelDataSize_emnist_mnist);
EmbedTfLiteModel("Recognizer-emnist-letters-binary.tflite", modelData_emnist_letters, modelDataSize_emnist_letters);
EmbedTfLiteModel("Recognizer-emnist-balanced-binary.tflite", modelData_emnist_balanced, modelDataSize_emnist_balanced);
EmbedTfLiteModel("Recognizer-emnist-bymerge-binary.tflite", modelData_emnist_bymerge, modelDataSize_emnist_bymerge);
For usage examples of the embedded models, refer to the source code of pico-Recognizer-ILI9341.cpp.