Keyboard & Mouse
This page explains how to use the Pico board's USB host functionality to connect USB keyboards and mice. When you can connect major input devices to the Pico, it becomes a truly standalone microcontroller—very fun! This article also covers how to add keyboard and mouse input to the LVGL GUI toolkit.
About Pico's USB Host Functionality
When working with the Pico, you often need button input. You could place tact switches on a breadboard, but the feel isn't great, and connection issues can cause stress during development. More importantly, it consumes a lot of precious GPIO pins, which is wasteful.
This is where the Pico's USB host interface comes in handy. As you might guess from the connector shape, the Pico is usually used as a USB device connected to a PC, but it can also function as a USB host. This means you can connect widely available PC USB peripherals to the Pico by writing the appropriate driver software.
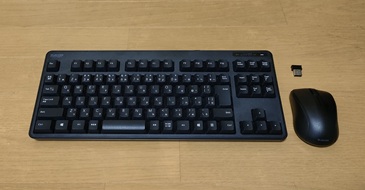
Among the many USB peripherals, keyboards and mice are especially affordable and come in many varieties. Even wireless types with both keyboard and mouse can be purchased for around 2,000 yen.
This greatly improves usability compared to tact switches, and with wireless types, you can even operate the Pico remotely, expanding your project possibilities.
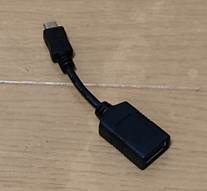
Note that the Pico uses a microB USB connector, so to use it as a host, you'll need an OTG adapter to convert to A type. These are available for about 400 yen.
For USB operations, pico-jxglib uses the tinyusb library, which is included with the Pico SDK. The tinyusb directory contains a sample for USB host functionality at tinyusb/examples/host/cdc_msc_hid, which was used as a reference to implement a more convenient API for keyboards and mice in pico-jxglib.
Example Project
Let's actually use a USB keyboard and mouse. Stdio can be used for detailed information, but since Stdio over USB can't be used in this setup, you can use LEDs on the Pico itself to confirm operation.
Creating a Project
From the VSCode command palette, run >Raspberry Pi Pico: New Pico Project and create a project with the following settings. For details on creating a Pico SDK project, building, and writing to the board, see "Getting Started with Pico SDK".
- Name ... Enter the project name. In this example, enter
usbhosttest. - Board type ... Select the board type.
- Location ... Select the parent directory where the project directory will be created.
- Stdio support ... Select the port (UART or USB) to connect Stdio, but since USB is used for this program, you can't select it. Either select UART or leave both unchecked.
- Code generation options ... Check
Generate C++ code
Assume the project directory and pico-jxglib are arranged as follows:
From here, edit CMakeLists.txt and the source file based on this project to create your program.
Breadboard Wiring
Here is the breadboard wiring image:
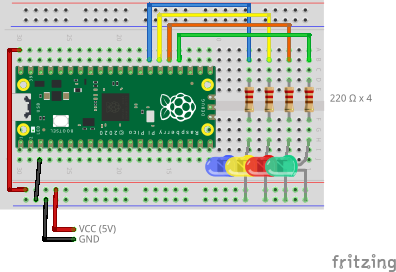
When running the Pico as a USB device, you can power it from the USB connector, but when using it as a host, you need to supply 5V to VBUS (pin 40) from an external source. If you connect power to VSYS (pin 39), the diode for reverse current protection will prevent power from reaching USB VBUS, so be careful.
Operating the USB Keyboard
To use the USB host functionality in pico-jxglib, use the USBHost class.
Create a USBHost::Keyboard instance and use the following APIs to get keyboard information:
Keyboard::IsPressed()— Checks if a specified key is pressedKeyboard::ScanKeyCode()— Returns the keycode of the pressed keyKeyboard::ScanKeyData()— Returns theKeyData(keycode and character code) of the pressed keyKeyboard::GetKeyCode()— While a key is pressed, repeats and returns the keycode; blocks if no key is pressedKeyboard::GetKeyCodeNB()— While a key is pressed, repeats and returns the keycode; returnsfalseimmediately if no key is pressedKeyboard::GetKeyData()— While a key is pressed, repeats and returns theKeyData; blocks if no key is pressedKeyboard::GetKeyDataNB()— While a key is pressed, repeats and returns theKeyData; returnsfalseimmediately if no key is pressed
Add the following lines to CMakeLists.txt:
target_link_libraries(usbhosttest jxglib_USBHost)
add_subdirectory(${CMAKE_CURRENT_LIST_DIR}/../pico-jxglib pico-jxglib)
jxglib_configure_USBHost(usbhosttest CFG_TUH_HID 3)
The jxglib_configure_USBHost() function generates the tusb_config.h header file needed for building tinyusb. The argument CFG_TUH_HID specifies the maximum number of HID interfaces to connect.
Below is an example using Keyboard::IsPressed(). The LED lights up when the specified key is pressed.
#include "pico/stdlib.h"
#include "jxglib/USBHost/HID.h"

using namespace jxglib;

int main()
{
    GPIO18.init().set_dir_OUT();
    GPIO19.init().set_dir_OUT();
    GPIO20.init().set_dir_OUT();
    GPIO21.init().set_dir_OUT();
    USBHost::Initialize();
    USBHost::Keyboard keyboard;
    for (;;) {
        GPIO18.put(keyboard.IsPressed(VK_V));
        GPIO19.put(keyboard.IsPressed(VK_C));
        GPIO20.put(keyboard.IsPressed(VK_X));
        GPIO21.put(keyboard.IsPressed(VK_Z));
        Tickable::Sleep(50);
    }
}
The Tickable::Sleep() function is specified in milliseconds. This function runs the tinyusb and pico-jxglib tasks.
Below is an example using Keyboard::GetKeyCodeNB(). The LED blinks in response to the repeated key presses.
#include "pico/stdlib.h"
#include "jxglib/USBHost/HID.h"

using namespace jxglib;

int main()
{
    GPIO18.init().set_dir_OUT();
    GPIO19.init().set_dir_OUT();
    GPIO20.init().set_dir_OUT();
    GPIO21.init().set_dir_OUT();
    USBHost::Initialize();
    USBHost::Keyboard keyboard;
    for (;;) {
        uint8_t keyCode;
        bool rtn = keyboard.GetKeyCodeNB(&keyCode);
        GPIO18.put(rtn && keyCode == VK_V);
        GPIO19.put(rtn && keyCode == VK_C);
        GPIO20.put(rtn && keyCode == VK_X);
        GPIO21.put(rtn && keyCode == VK_Z);
        Tickable::Sleep(50);
    }
}
Operating the USB Mouse
The USB mouse functionality is also implemented in the USBHost class.
Create a USBHost::Mouse instance and use the Mouse::CaptureStatus() function to get the mouse status. The information you get is as follows:
- Current position
- Movement amount
- Wheel operation amount
- Pan operation amount
Add the following lines to CMakeLists.txt:
target_link_libraries(usbhosttest jxglib_USBHost)
add_subdirectory(${CMAKE_CURRENT_LIST_DIR}/../pico-jxglib pico-jxglib)
jxglib_configure_USBHost(usbhosttest CFG_TUH_HID 3)
The mouse data example shows that the LED lights up when you move the mouse left or right, or when you click the left or right mouse button.
#include "pico/stdlib.h"
#include "jxglib/USBHost/HID.h"

using namespace jxglib;

int main()
{
    GPIO18.init().set_dir_OUT();
    GPIO19.init().set_dir_OUT();
    GPIO20.init().set_dir_OUT();
    GPIO21.init().set_dir_OUT();
    USBHost::Initialize();
    USBHost::Mouse mouse;
    for (;;) {
        Mouse::Status status = mouse.CaptureStatus();
        GPIO21.put(status.GetDeltaX() < 0);
        GPIO20.put(status.GetDeltaX() > 0);
        GPIO19.put(status.GetButtonLeft());
        GPIO18.put(status.GetButtonRight());
        Tickable::Sleep(50);
    }
}
LVGL and USB Keyboard/Mouse
LVGL is a library for implementing GUIs on embedded devices. For details, see the following article.
https://zenn.dev/ypsitau/articles/2025-02-04-lvgl
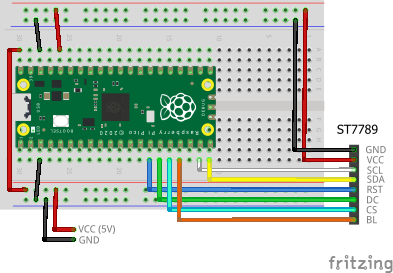
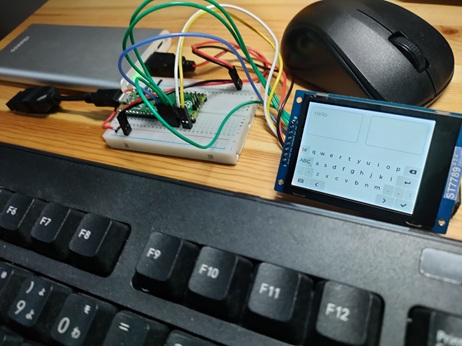
LVGL's user interface often uses touch screens, but here we're connecting a USB keyboard and mouse. We'll use the ST7789 TFT LCD. For other devices, see "pico-jxblib and TFT LCD".
The breadboard wiring image is as follows:
Add the following lines to CMakeLists.txt:
target_link_libraries(usbhosttest jxglib_USBHost jxglib_Display_ST7789 jxglib_LVGL lvgl_examples)
add_subdirectory(${CMAKE_CURRENT_LIST_DIR}/../pico-jxglib pico-jxglib)
jxglib_configure_USBHost(usbhosttest CFG_TUH_HID 3)
jxglib_configure_LVGL(usbhosttest LV_FONT_MONTSERRAT_14)
The source code is as follows:
#include <lvgl/examples/lv_examples.h>
#include "pico/stdlib.h"
#include "jxglib/USBHost/HID.h"
#include "jxglib/Display/ST7789.h"
#include "jxglib/LVGL.h"

using namespace jxglib;

int main()
{
    ::stdio_init_all();
    ::spi_init(spi1, 125 * 1000 * 1000);
    GPIO14.set_function_SPI1_SCK();
    GPIO15.set_function_SPI1_TX();
    USBHost::Initialize();
    USBHost::Keyboard keyboard;
    USBHost::Mouse mouse;
    Display::ST7789 display(spi1, 240, 320, {RST: GPIO10, DC: GPIO11, CS: GPIO12, BL: GPIO13});
    display.Initialize(Display::Dir::Rotate90);
    LVGL::Initialize(5);
    LVGL::Adapter lvglAdapter;
    lvglAdapter.AttachDisplay(display)
        .AttachKeyboard(keyboard)
        .AttachMouse(mouse);
    ::lv_example_keyboard_1();
    for (;;) Tickable::Tick();
}
The LVGL::Adapter instance is used to connect the USB keyboard and mouse to LVGL. The Tickable::Tick() function runs the tinyusb, LVGL, and pico-jxglib tasks.