Game Pad
Previously, I published an article titled "Connecting USB Keyboards and Mice to the Pico Board with pico-jxglib". This time, we'll use the Pico's USB host functionality to connect a USB gamepad to the Pico board—and enjoy some games as well.
About USB Gamepads
As the name suggests, gamepads are devices primarily designed for gaming, but they are also useful as manipulators for controlling robots. They typically feature two analog joysticks (left and right), a D-pad, and more than 10 buttons, all housed in a body that allows efficient operation with both hands. The fact that such devices are available for just a few thousand yen is very appealing.
However, since many manufacturers have released products with various specifications, the standards are quite chaotic. To help you choose a suitable product, here is a brief summary of gamepad specifications.
DirectInput and XInput
There are two main interface standards for USB gamepads: DirectInput and XInput. pico-jxglib supports DirectInput.
DirectInput is an old standard implemented as a USB HID class. The HID class is designed to support various human interface devices such as keyboards, mice, buttons, analog joysticks, touch panels, and pointing devices. It uses a specification called the Report Descriptor, which allows the device to define its own data format. This flexibility enables manufacturers to freely arrange the number and layout of buttons and controls, but it also leads to disorder. Not only do the bit layouts in the report data differ between products, but the interpretation of Usage values (which define the purpose of buttons, etc., in the Report Descriptor) also varies by manufacturer—and sometimes even between products from the same manufacturer. The multimedia library SDL for PCs provides a gamepad API, but it absorbs these differences using a device-specific database.
XInput is a gamepad-specific interface proposed by Microsoft during the development of the Xbox game console. Perhaps to avoid the disorder of DirectInput, XInput strictly defines the number and layout of buttons and joysticks. However, it is not a HID class; instead, it is treated as a vendor-specific class with Vendor ID 0x045E (Microsoft) and Product ID 0x028E (Xbox 360 Controller), among others. Because it is a vendor-specific class, third-party manufacturers who want to support XInput must install their own Vendor ID and Product ID into the OS using INF files, etc.1
Many third-party gamepads can switch between DirectInput and XInput modes. However, gamepads marketed as Xbox controllers naturally support only XInput.
USB Gamepads Compatible with the Pico Board
Out of all commercially available USB gamepads, only a limited number can be connected to the Pico board. I obtained three gamepads from different vendors, but only one of them worked.
-
The EasySMX wireless ESM-9013 was not recognized even when the receiver was connected to the USB port. It was recognized if the board was reset while connected, but it remained unstable when connected via a USB hub. Once connected successfully, report reception worked normally.
-
The Logicool wired F310 is a very popular product, but I have not been able to use it so far. There are no hardware connection issues, and the descriptor can be retrieved, but reports cannot be received. There were rare occasions when reports were received, so I believe this can be resolved by fixing tinyusb, but the cause is unknown.
-
The Elecom wireless JC-U4113S is the only gamepad among those I have that works reliably.
About the Report Descriptor Parser
USB HID class devices periodically send data called reports to the host, and the format of this data is defined by the Report Descriptor. The Report Descriptor provides information such as the position of keyboard, button, and joystick data within the report, their maximum and minimum values, and their intended usage.
To support various data types, the format specification is somewhat complex. When obtaining information from a USB gamepad, I was hesitant to create a full-fledged parser just to handle a few dozen bytes of data. If you only want to support a specific USB gamepad, you can simply hard-code the structure. In fact, the tinyusb sample for gamepads is implemented this way.
However, I couldn't resist the urge to implement a parser that can extract all information from the Report Descriptor. This should allow support for various gamepads, and since it would be a waste not to use it for other purposes, I plan to write a separate article detailing it.
Creating the Monitor Program
Let's create a monitor program that displays the gamepad's button and joystick information on a TFT LCD.
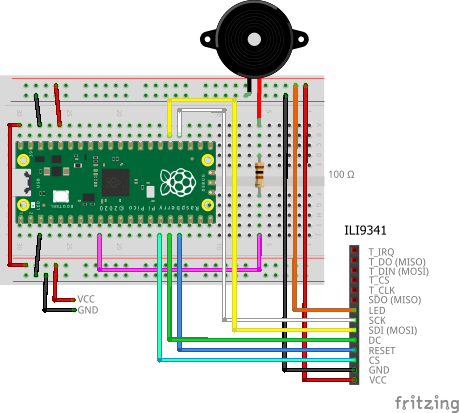
Wiring Diagram
Below is a breadboard wiring diagram using the ILI9341 TFT LCD. The USB gamepad is connected via an OTG cable that converts from microB to type A. The piezo buzzer is for the game introduced later.
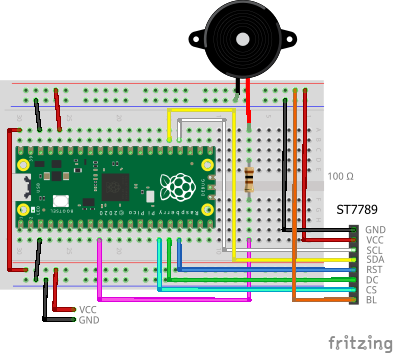
Below is a breadboard wiring diagram using the ST7789 TFT LCD.
Creating the Project
From the VSCode command palette, run >Raspberry Pi Pico: New Pico Project and create a project with the following settings. For details on creating a Pico SDK project, building, and writing to the board, see "Getting Started with the Pico SDK".
- Name ... Enter the project name. For example, enter
usbhost-gamepad-monitor. - Board type ... Select the board type.
- Location ... Select the parent directory where the project directory will be created.
- Stdio support ... Leave both unchecked.
- Code generation options ... Check
Generate C++ code.
Assume the project directory and pico-jxglib directory are arranged as follows:
├── pico-jxglib/
└── usbhost-gamepad-monitor/
    ├── CMakeLists.txt
    ├── usbhost-gamepad-monitor.cpp
    └── ...
Add the following lines to the end of CMakeLists.txt:
target_link_libraries(usbhost-gamepad-monitor jxglib_USBHost jxglib_Display_ILI9341 jxglib_Display_ST7789)
add_subdirectory(${CMAKE_CURRENT_LIST_DIR}/../pico-jxglib pico-jxglib)
jxglib_configure_USBHost(usbhost-gamepad-monitor CFG_TUH_HID 3)

jxglib_configure_USBHost(usbhost-gamepad-monitor CFG_TUH_HID 3)

Edit the source file `usbhost-gamepad-monitor.cpp` as follows.

```cpp title="usbhost-gamepad-monitor.cpp"
#include <stdio.h>
#include "pico/stdlib.h"
#include "jxglib/Display/ILI9341.h"
#include "jxglib/Display/ST7789.h"
#include "jxglib/USBHost/HID.h"
#include "jxglib/Font/naga10.h"

using namespace jxglib;

int main()
{
    ::stdio_init_all();
    ::spi_init(spi0, 125 * 1000 * 1000);
    GPIO18.set_function_SPI0_SCK();
    GPIO19.set_function_SPI0_TX();
    Display::Terminal terminal;
    Display::ILI9341 display(spi0, 240, 320, {RST: GPIO13, DC: GPIO12, CS: GPIO11, BL: GPIO::None});
    //Display::ST7789 display(spi0, 240, 320, {RST: GPIO13, DC: GPIO12, CS: GPIO11, BL: GPIO::None});
    display.Initialize(Display::Dir::Rotate270);
    terminal.Initialize().AttachDisplay(display).SetFont(Font::naga10);
    USBHost::Initialize();
    USBHost::GamePad gamePad;
    terminal.Printf("USB GamePad Monitor\n");
    for (;;) {
        if (gamePad.HasReportChanged()) {
            terminal.Printf("%s%s%s%s%s%s%s%s%s%s%s%s%s %X % 1.2f% 1.2f% 1.2f% 1.2f% 1.2f% 1.2f% 1.2f% 1.2f% 1.2f\n",
                gamePad.Get_Button0()? "0" : ".",
                gamePad.Get_Button1()? "1" : ".",
                gamePad.Get_Button2()? "2" : ".",
                gamePad.Get_Button3()? "3" : ".",
                gamePad.Get_Button4()? "4" : ".",
                gamePad.Get_Button5()? "5" : ".",
                gamePad.Get_Button6()? "6" : ".",
                gamePad.Get_Button7()? "7" : ".",
                gamePad.Get_Button8()? "8" : ".",
                gamePad.Get_Button9()? "9" : ".",
                gamePad.Get_Button10()? "A" : ".",
                gamePad.Get_Button11()? "B" : ".",
                gamePad.Get_Button12()? "C" : ".",
                gamePad.Get_HatSwitch(),
                gamePad.Get_Axis0(),
                gamePad.Get_Axis1(),
                gamePad.Get_Axis2(),
                gamePad.Get_Axis3(),
                gamePad.Get_Axis4(),
                gamePad.Get_Axis5(),
                gamePad.Get_Axis6(),
                gamePad.Get_Axis7(),
                gamePad.Get_Axis8());
        }
        Tickable::Sleep(300);
    }
}
Create a USBHost::GamePad instance to obtain gamepad information. The functions Get_Button0() to Get_Button12() retrieve button states and return true or false depending on whether the button is pressed. Get_Axis0() to Get_Axis8() return analog joystick values from -1 to +1.
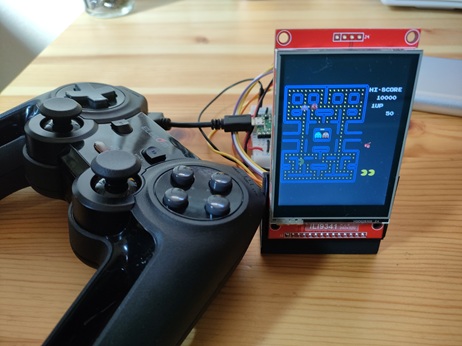
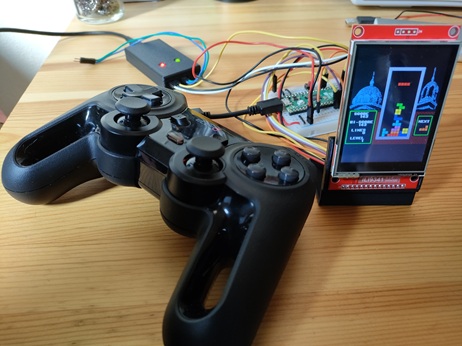
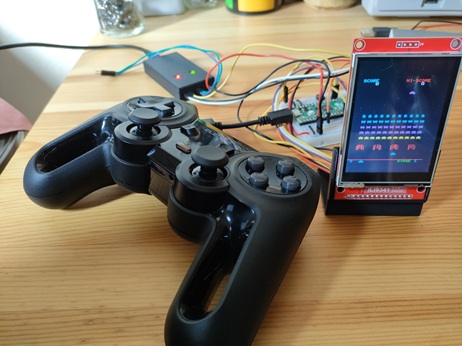
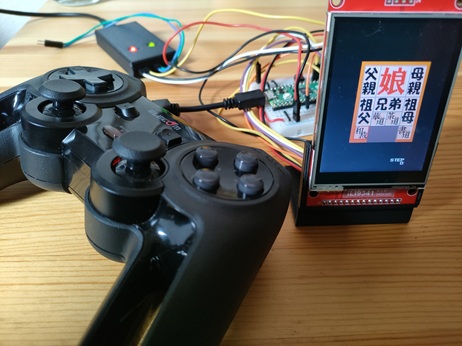
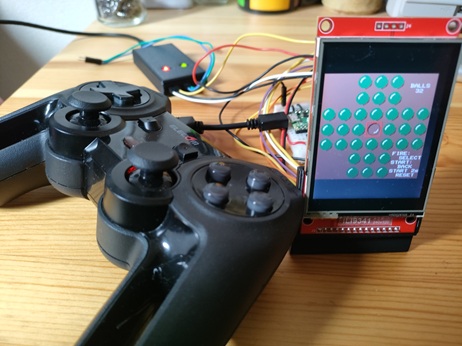
Enjoying Games with a Gamepad
Now that you've connected a gamepad, you probably want to enjoy some games—the main purpose of the device! I found some high-quality games that run on the Pico board in KenKen's LCD Game Development with Raspberry Pi Pico, and made it possible to play these games using a gamepad.
The button and joystick assignments for the gamepad are as follows. As mentioned earlier, the actual mapping of each button and analog joystick may differ depending on the model, but this general assignment should work for most cases (excluding the right analog joystick).
- Left and right analog joysticks ... Up, Down, Left, Right
- D-pad ... Up, Down, Left, Right
- A, B, X, Y buttons ... Fire
- Other buttons ... Start
For wiring, please refer to the [diagram above].
How to Build
-
Clone the repositories.
git clone https://github.com/ypsitau/picopacman git clone https://github.com/ypsitau/picotetris git clone https://github.com/ypsitau/picoinvader git clone https://github.com/ypsitau/picohakomusu git clone https://github.com/ypsitau/picopegsol git clone https://github.com/ypsitau/pico-jxglib cd pico-jxglib git submodule update --init -
Move to the directory of the game you want to build and run
code .to launch VSCode. When the message boxDo you want to import this project as Raspberry Pi Pico project?appears, click[Yes]. -
The
Import Pico Projectpane will open. Review the contents and click[Import]. -
From the command palette, run
>Raspberry Pi Pico: Switch Boardand select the board you want to use. -
From the command palette, run
>CMake: Buildor press[F7]. When theSelect a kit for projectcombo box appears, selectPico Using compilers:...to build the project.
By default, the ILI9341 is set as the TFT LCD. If you want to use the ST7789, uncomment the //#define USE_ST7789 line in ili9341_spi.c.
Pac-Man
UF2 files
Tetris
UF2 files
Invader Game
UF2 files
Hakoniwa Puzzle
Peg Solitaire
-
Some gamepads use Microsoft's Vendor ID and Product ID for their own products without permission. This may be to allow easy connection without installation, but it is essentially device spoofing and could be problematic. ↩