Shell with Display (OLED)
Example Project
Creating the Project
From the VSCode command palette, run >Raspberry Pi Pico: New Pico Project and create a project with the following settings. For details on creating a Pico SDK project, building, and writing to the board, see "Getting Started with Pico SDK".
- Name ... Enter the project name. In this example, enter
shell-test. - Board type ... Select the board type.
- Location ... Select the parent directory where the project directory will be created.
- Stdio support ... If using a serial console for the terminal, select the port (UART or USB) to connect Stdio. If using a USB keyboard for the terminal, uncheck USB.
- Code generation options ... Check
Generate C++ code
Assume the project directory and pico-jxglib are arranged as follows:
From here, edit CMakeLists.txt and the source file based on this project to create your program.
Embedding the Shell
To embed the shell in your program, write the following code:
- Create and initialize a
Terminalinstance (Serial::TerminalorDisplay::Terminal) to use with the shell - Connect the
Terminalinstance to the shell with theShell::AttachTerminal()function - In the main loop, call
Tickable::Tick()orTickable::Sleep()
How you create the Terminal instance depends on what you use for the terminal. Here are some examples:
Using OLED SSD1306 and USB Keyboard as the Terminal
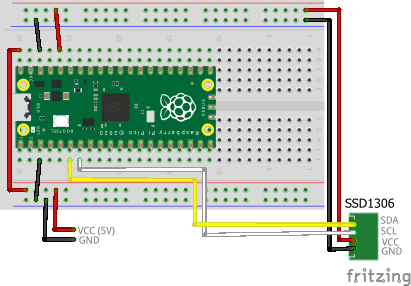
This can be used in environments where an OLED SSD1306 and USB keyboard are connected to the Pico board. Since you need to initialize the OLED and set up I2C, there is more code to write, but it can run standalone on the Pico board.
The breadboard wiring image is as follows:
Add the following line to the end of CMakeLists.txt. Also, make sure USB connection for Stdio is disabled (pico_enable_stdio_usb(shell-test 0)).
target_link_libraries(shell-test jxglib_USBHost jxglib_Display_SSD1306 jxglib_Shell jxglib_ShellCmd_Basic)
add_subdirectory(${CMAKE_CURRENT_LIST_DIR}/../pico-jxglib pico-jxglib)
jxglib_configure_USBHost(shell-test CFG_TUH_HID 3)
Edit the source file as follows.
#include <stdio.h>
#include "pico/stdlib.h"
#include "jxglib/Display/SSD1306.h"
#include "jxglib/USBHost/HID.h"
#include "jxglib/Shell.h"
#include "jxglib/Font/shinonome12.h"
    GPIO5.set_function_I2C0_SCL().pull_up();
        .AttachKeyboard(keyboard.SetCapsLockAsCtrl()).SetFont(Font::shinonome12);
Running Shell Commands
By linking the jxglib_ShellCmd_Basic library, you can use basic shell commands.