Custom Commands
Sample Program
Here, we will create a sample program that implements a custom command named argtest. It displays the contents of the arguments passed to it.
Create a new Pico SDK project named customcmd-argtest. Uncheck Console over USB in Stdio support as this project uses LABOPlatform.
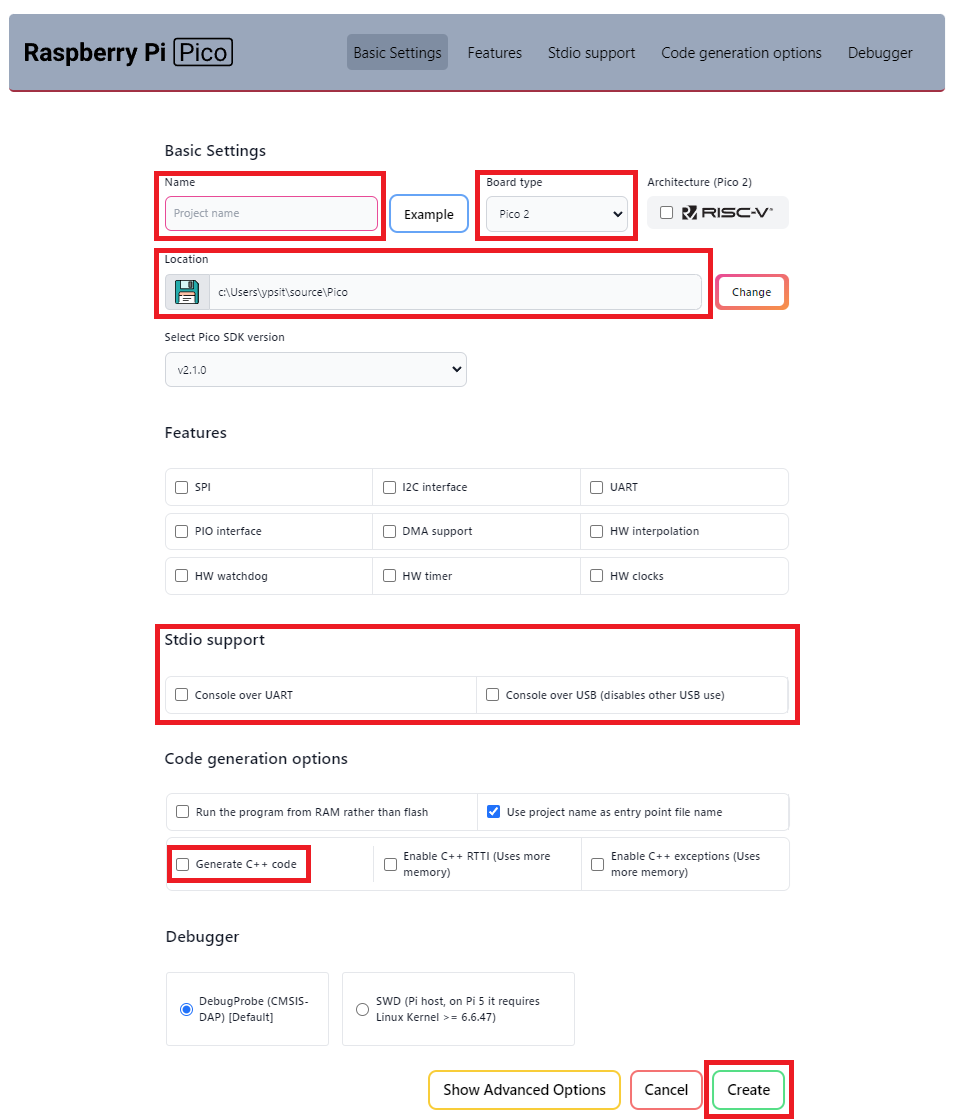
Create Pico SDK Project
- In VSCode, run
>Raspberry Pi Pico: New Pico Projectin the command palette. -
In the dialog below, select
C/C++.
-
Create a project with the following settings:
- Name ... Enter the project name.
- Board type ... Select your board type.
- Location ... Select the parent directory where the project directory will be created.
- Stdio support ... Check
Console over UARTand/orConsole over USBfor stdio. DON'T checkConsole over USBwhen you use LABOPlatform or other USB features because they conflict with each other. - Code generation options ... Check
Generate C++ code.
Clone the pico-jxglib repository from GitHub so the direcory structure looks like this:
Clone the Repository
Change the current directory to the parent directory where you want to clone the pico-jxglib repository and run the following commands:
$ git clone https://github.com/ypsitau/pico-jxglib.git
$ cd pico-jxglib
$ git submodule update --init --recursive
pico-jxglib is updated almost daily. If you've already cloned it, run the following command in the pico-jxglib directory to get the latest version:
A directory from a Git repository can safely be moved to another location even after cloning.
Add the following lines to the end of CMakeLists.txt:
target_link_libraries(customcmd-argtest jxglib_LABOPlatform_FullCmd)
add_subdirectory(${CMAKE_CURRENT_LIST_DIR}/../pico-jxglib pico-jxglib)
jxglib_configure_LABOPlatform(customcmd-argtest)
Edit customcmd-argtest.cpp as follows:
#include "pico/stdlib.h"
#include "jxglib/LABOPlatform.h"

using namespace jxglib;

ShellCmd(argtest, "tests command line arguments")
{
    for (int i = 0; i < argc; i++) {
        tout.Printf("argv[%d] \"%s\"\n", i, argv[i]);
    }
    return Result::Success;
}

int main(void)
{
    ::stdio_init_all();
    LABOPlatform::Instance.Initialize();
    for (;;) {
        Tickable::Tick();
    }
}
After building the project by pressing F7, you can find the generated UF2 file in the build directory. Connect your Pico to the computer using a USB cable while holding the BOOTSEL button, and it will appear as a mass storage device, to which you can copy the generated UF2 file to flash it.
Open a terminal emulator program to connect it.
Setup Tera Term for LABOPlatform
From the menu bar, select [File] - [New Connection...] to open the dialog below:
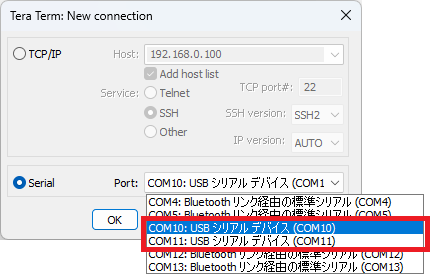
pico-jxgLABO or a firmware based on LABOPlatform provides two USB serial ports: one for terminal use and the other for applications such as logic analyzers and plotters. Select one of the ports and press Enter key in the terminal. When successfully connected, you will see the prompt in the terminal:
Check if the argtest command works:
The custom command also appears in the help list:
L:/>help
    :
adc3                      controls ADC (Analog-to-Digital Converter)
adc4                      controls ADC (Analog-to-Digital Converter)
argtest                   tests command line arguments
camera                    controls cameras
camera-ov7670             controls OV7670 camera module
    :
Program Explanation
ShellCmd Macro
To create a shell command, use the ShellCmd macro. The macro format is as follows:
The following variables are passed to the command program:
Printable& tout...Printableinstance. Used to puts texts to the terminal or to a file through redirection.Printable& terr...Printableinstance. Used to puts texts to the terminal regardless of redirection.int argc... Number of argumentschar** argv... Argument strings.argv[0]contains the command name itself
Return Result::Success if there is no error, or Result::Error if an error occurs.
You do not need to register commands. When you create a command with the ShellCmd macro, it is automatically registered with the shell. With this mechanism, you can add commands simply by linking the source file that implements the command to the main program.
Utility APIs
Shell::Cmd::Arg class provides utility APIs for parsing command line arguments. You can define the expected arguments and their options in a table, and then use the Shell::Cmd::Arg class to parse the command line arguments based on that table. This makes it easier to handle various types of arguments, such as boolean flags, integers, floating-point numbers, and strings.
static const Shell::Cmd::Arg::Opt optTbl[] = {
    Shell::Cmd::Arg::OptBool("help",    'h', "prints this help"),
    Shell::Cmd::Arg::OptBool("flag",    'b', "a boolean flag"),
    Shell::Cmd::Arg::OptInt("num",      'i', "specifies a number", "n"),
    Shell::Cmd::Arg::OptFloat("float",  'f', "specifies a floating point number", "n"),
    Shell::Cmd::Arg::OptString("name",  's', "specifies a name", "str"),
};
Shell::Cmd::Arg arg(optTbl, count_of(optTbl));