Sample: Dot
Let's actually display an image. Here, we use an LED strip with 60 WS2812 LEDs in series to show an animation of a flowing red dot.
- Set up the display. Connect the DIN terminal of the LED to GPIO2.
- Download the image file red-dot.png. When enlarged, the pixel image looks like this:

 Image of
 red-dot.png
Save this file to the Pico board's internal storage L: drive. When the Pico board is connected to the host PC via USB cable, the L: drive appears as a USB memory device on the host PC, so copy the file there.
- Use the
image-loadsubcommand of thedrawcommand to load the image file into the image buffer.
- Run the
imagesubcommand to display the contents of the image buffer on the display. Here, use thesizesubcommand to set the display area in the image to 8 x 1.
Only one red LED lights up.
- Using the
repeat-xsubcommand, you can repeat the image across the entire width of the display. Let's check that a red LED lights up every 8 LEDs.
- The
offset-shiftsubcommand shifts the display area within the image by a specified amount. The following example shifts the display area 1 pixel to the right.
This operation changes the display as shown below, making it look like the dot is moving.
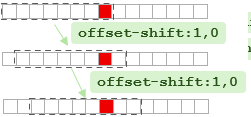
Try running it several times to see the red LED move. When the display area reaches the right end, offset-shift wraps it back to the left.
- The
repeatsubcommand repeatedly executes the subcommands inside the braces{}. PressCtrl-Cto stop the repetition.
If the display speed is too fast and all LEDs appear lit, use the sleep subcommand to pause for the specified milliseconds. The following example shifts the display position every 100ms.
The illumination strip is complete!
Here is a summary of the commands to run: